In this article:
Designing Your Page
Importing Your Design
Multipage PDFs
Fitting The Design To The Page
If you want to have complete control of the design of a page in your yearbook then you can use our Custom Page feature. This lets you design the page using your favourite software, or use a photograph as an entire page or double page spread. It is a great way of getting creative and adding some unique and personal touches to your yearbook.
Designing Your Page
You can design your page using whatever software you’re most comfortable with. We use Adobe InDesign to make your yearbook, but it is entirely up to you, as long as you can export it as an image or a PDF. Alternatively, you could do the design on paper and scan it in – this is great if you are particularly handy with a paint brush or crayons!
It is important that your design is the same size as the pages in our book, otherwise we will have to either shrink it so that it all fits onto the page, or crop off some of the design, neither of which are desirable. Custom pages in our books need to be 169mm x 256mm, so you should always set up your design software with these dimensions.
Importing Your Design
Once you have made your design, you need to import it into your book. Firstly, add a new page with the page type Custom, and you will be presented with a blank page to upload your file to.
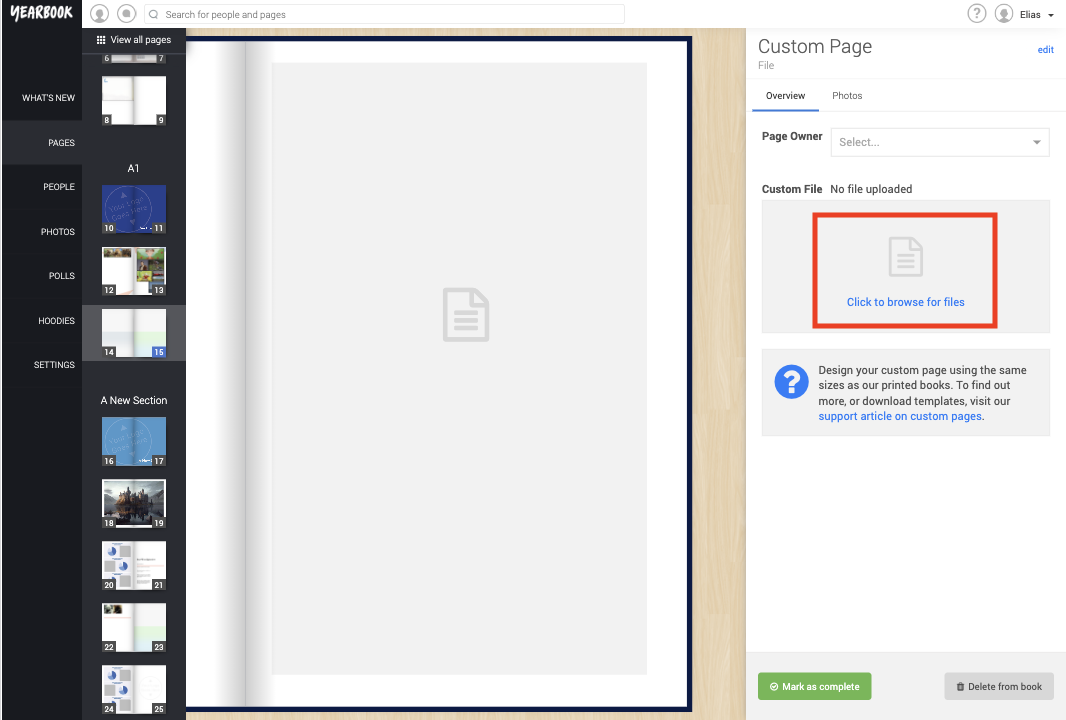
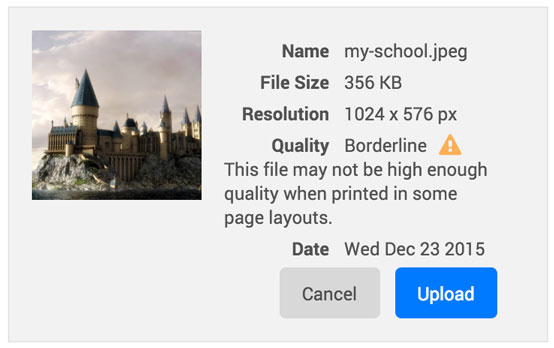
To upload your file, simply click the area in the tray on the right that says Click to browse for files. This opens a file browser and you can pick the file that you want to upload. A preview of the file will be displayed, along with some information about it, such as the name, file size and resolution. If you have selected an image then the quality will be detected and you will be warned if it is not good enough quality to be printed as a custom page. It is important that you use high resolution images because otherwise the page will look blurry and pixelated. Press Upload and the file will be uploaded and placed onto your custom page using the default settings.
Multipage PDFs
The Custom Page editor lets you have a design and import PDFs that are more than one page long. We split the PDF into its individual pages and create a page in your yearbook for each of the pages in the PDF. Each page of the PDF will be placed on the corresponding page of the yearbook. You will be shown a preview of how each page will look, and asked to confirm before we create all the new pages in your yearbook.
Fitting The Design To The Page
Now that your file is uploaded, you can make some adjustments to how we place that file onto the page. The easiest way to understand what each setting does it to play around with them – if you select a different setting it will be instantly shown in the page preview on the left, so you can decide what looks best to you. Here is a quick run down of what each of the settings do:
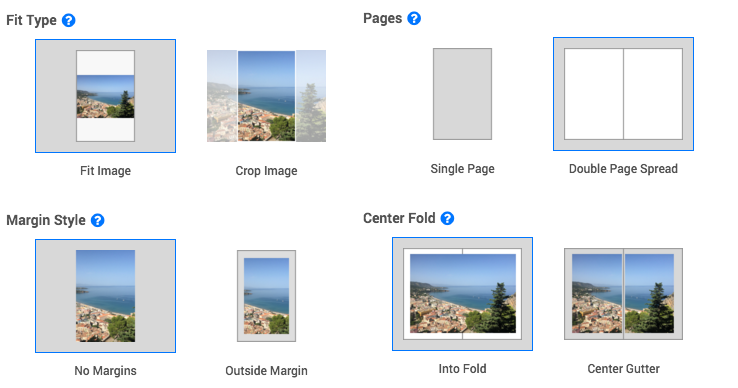
- Fit Image: If the image is not the same size as the page, then it will be scaled down until it completely fits on the page. None of the image will be lost, but there will be white space on the page.
- Crop Image: If the image is not the same size as the page, then it will be scaled up until the entire page is covered. There will be no white space on the page, but some of the image will be lost.
- No Margins: The image will go right up to the edge of the page, and there will be no white space around it. There is a 3mm area around the page called the bleed, which the image will be expanded into, and is then trimmed off when the book is printed, so if you choose this option make sure there is no important details in the very edge of the image.
- Outside Margin: A small white margin will surround the image.
- Single Page: One page. Best for portrait designs.
- Double Page: A double page spread. Best for landscape designs.
- Into Fold: The image will be printed into the fold of a double page spread. This is best for photos, as long as there is no detail in the centre, as this could be lost in the fold.
- Centre Gutter: A small white gutter will be in the middle of the double page spread, where the fold is. Use this if there is details in the centre of the image that you don’t want to lose.